💵 Subscription Products, Plans and Pricing
SaaSykit comes with support for a customizable product management system that allows you to create multiple products, each with multiple plans, and each plan can have multiple intervals (monthly, yearly, etc), prices, and features.
At a glance, SaaSykit supports most of the common subscription billing scenarios that you might need to implement for your SaaS application, configurable in a few clicks from the Admin Panel, such as:
- Flat rate plans (fixed price that doesn't change based on usage) → $10/month.
- Usage-based plans (billed based on the usage of the customer, e.g. number of API requests, number of emails sent, etc). → $0.01 per API request.
- Seat-based plans (billed per seat, only available for SaaSykit Tenancy). → $10/month/user.
- Seat-based with included seats (a certain number of seats are included in the plan price, and then additional seats are billed per seat, only available for SaaSykit Tenancy). → $100/month for up to 10 users, then $10/month/user after that.
- Trial periods for each plan (with or without requiring credit card details).
- Setup fees for each plan.
- Upgrading and downgrading between plans.
- Multiple active subscriptions per user/tenant (if enabled)
- And more.
Subscription Products
A subscription product is a product you sell that has a collection of plans that you offer to your customers. For example, you can have a product called "Basic" that has a monthly plan and a yearly plan. You can also have a product called "Pro" that has a monthly plan and a yearly plan.
Each product can have a set of metadata that you define in the Admin Panel that is accessible to your application via a helper function. You can use this metadata to store information about the product that you want to access in your application. For example, you can store the number of users allowed in the product, and then use the helper function SubscriptionService::getUserSubscriptionProductMetadata() to access that information in your application and display it to your users or check against it.
Another example: if you are offering an API access to your customers where you allow different number of requests per product, you can store that information in the product metadata and then use it in your application to check against it.
This offers a lot of flexibility and allows you to customize your product offering to your customers and have this data in centralized place.
To create a new product, go to the Admin Panel and under "Product Management" click on "Subscription Products", then click on "New Subscription Product". You will be redirected to the create product page.
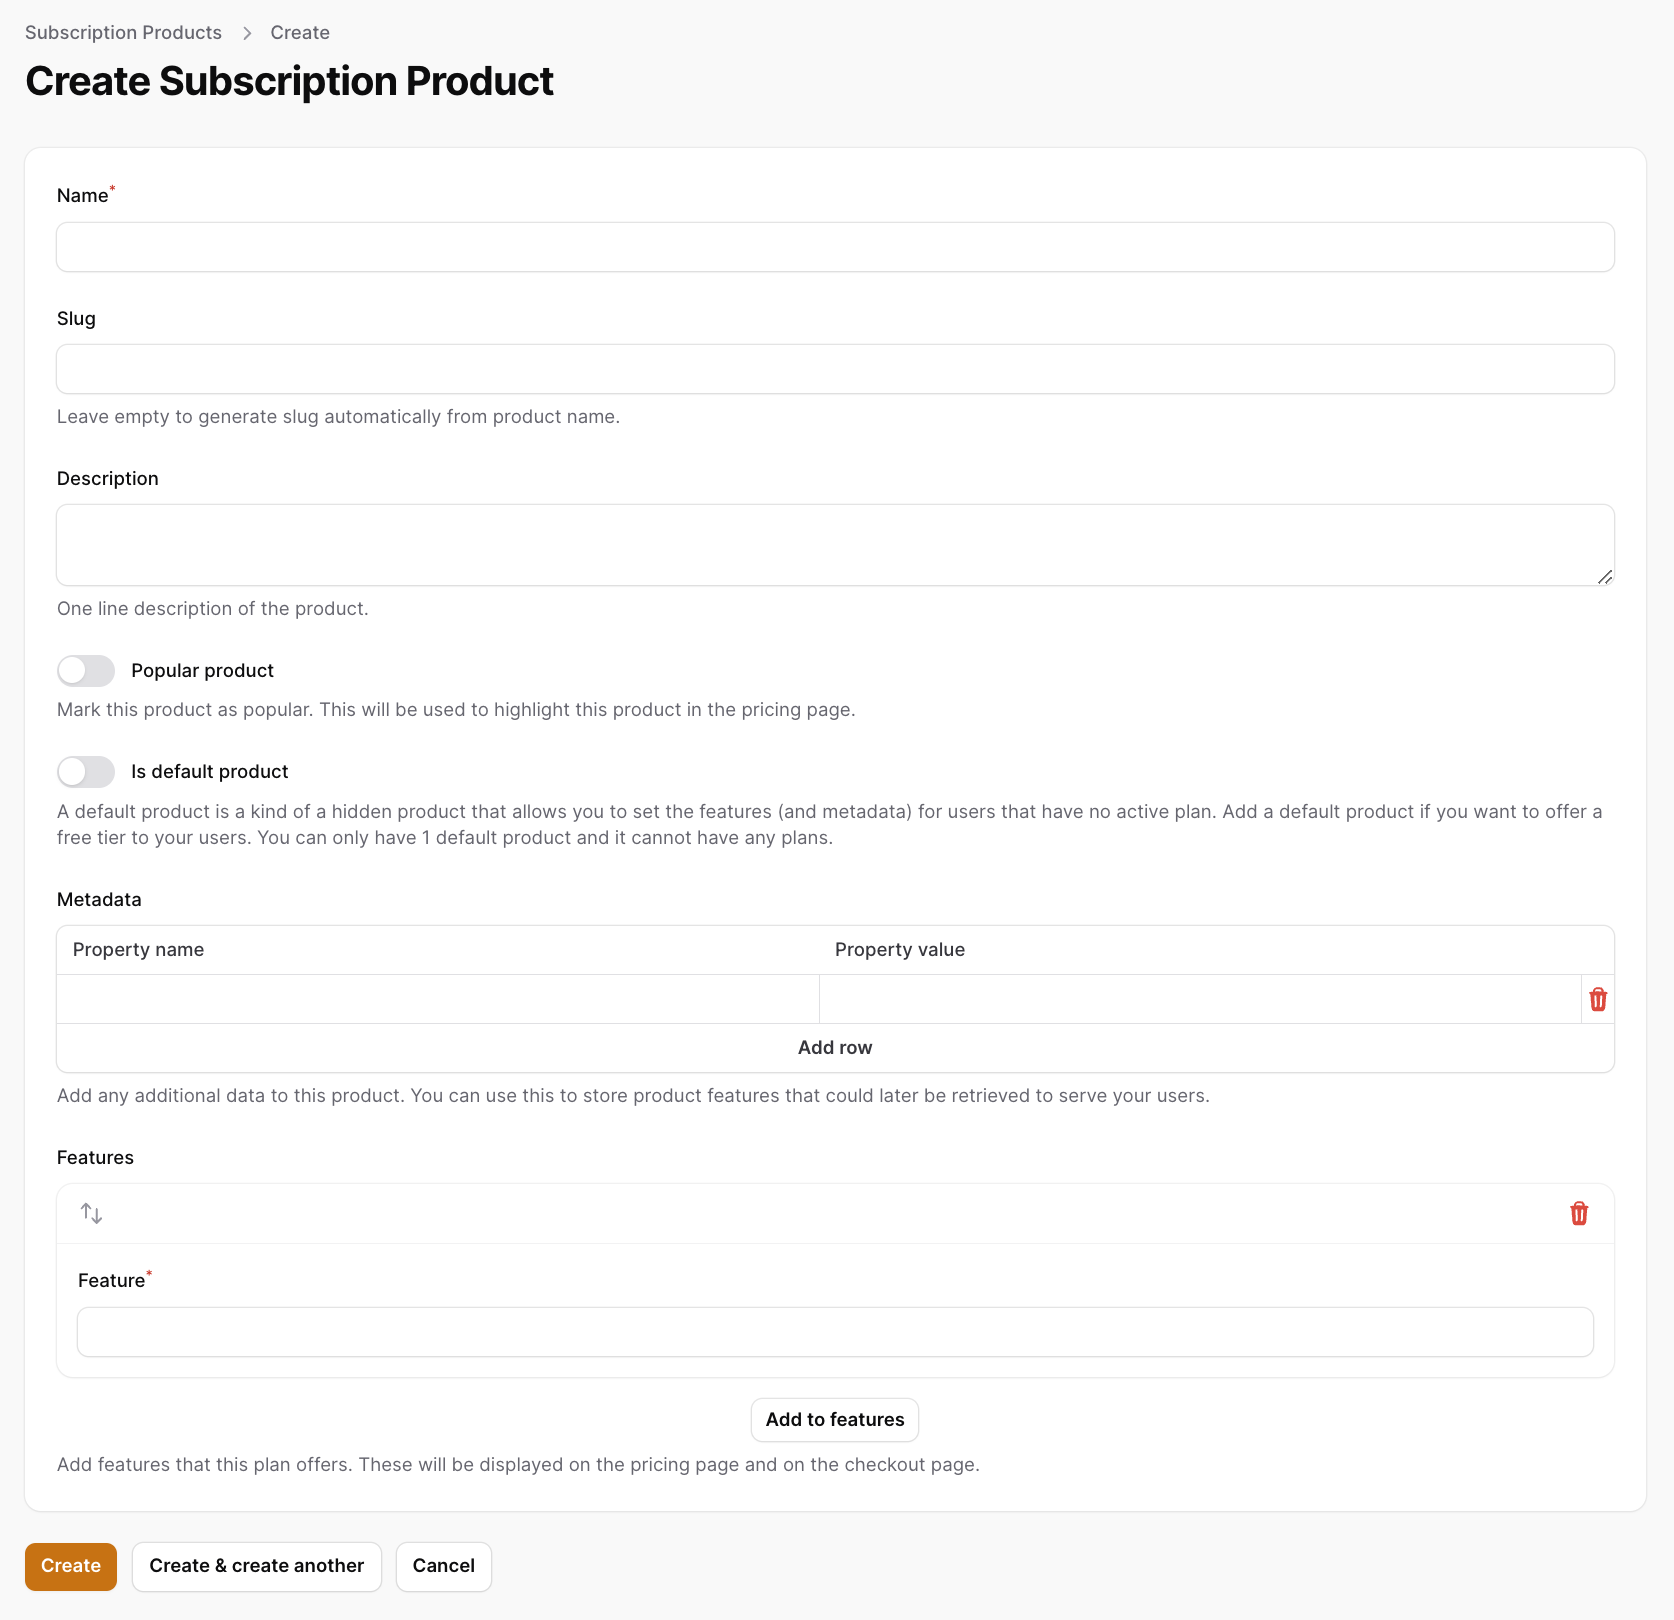
You need to enter the following information about your new product:
- Name: The name of the product.
- Slug: The slug of the product. This will be generated automatically based on the name, but you can change it if you want.
- Description: The description of the product.
- Popular Product: Whether this product is popular or not. This will be used to display the product as the "most popular" product in the plans component.
- Is default product: Whether this product is the default product or not. Default products will be assigned to users who are not subscribed to any product/plan. They are basically a virtual container to the "metadata" that you want to assign to users who are not subscribed to any product/plan.
For example, if you are building an image generation service and want to offer your non-subscribed users a 50 image generations per month as a free tier, then you can create a product called "Free" and set it as the default product, and then assign a metadata to it called "image_generations" and set it to 50. Then you can use the helper function SubscriptionService::getUserSubscriptionProductMetadata() to access this metadata in your application and check against it.
You can display the default product for your users in the plans component by setting theshow-default-productattribute totrue.
You can only have one default product at a time.
- Metadata: The metadata of the product. This is a JSON object that you can use to store any information you want about the product. For example, you can store the number of users allowed in the product, and then use SubscriptionService::getUserSubscriptionProductMetadata() to access that information in your application and display it to your users or check against it.
- Features: The features of the product. These will be displayed during checkout and in the plans component to show the features of each plan to your users.
Plans
A plan is a time period (time interval) at which you want your subscription product to be billed (monthly, yearly, etc). For example, you might have a product called "Basic" that has a monthly plan called Basic Monthly (with a monthly interval) and a yearly plan called Basic Yearly (with a yearly interval). This means that your customers will be able to subscribe to your "Basic" product and choose to be billed either monthly or yearly.
To create a new plan, go to the Admin Panel and under "Product Management" click on "Plans", then click on "New Plan". You will be redirected to the create plan page.
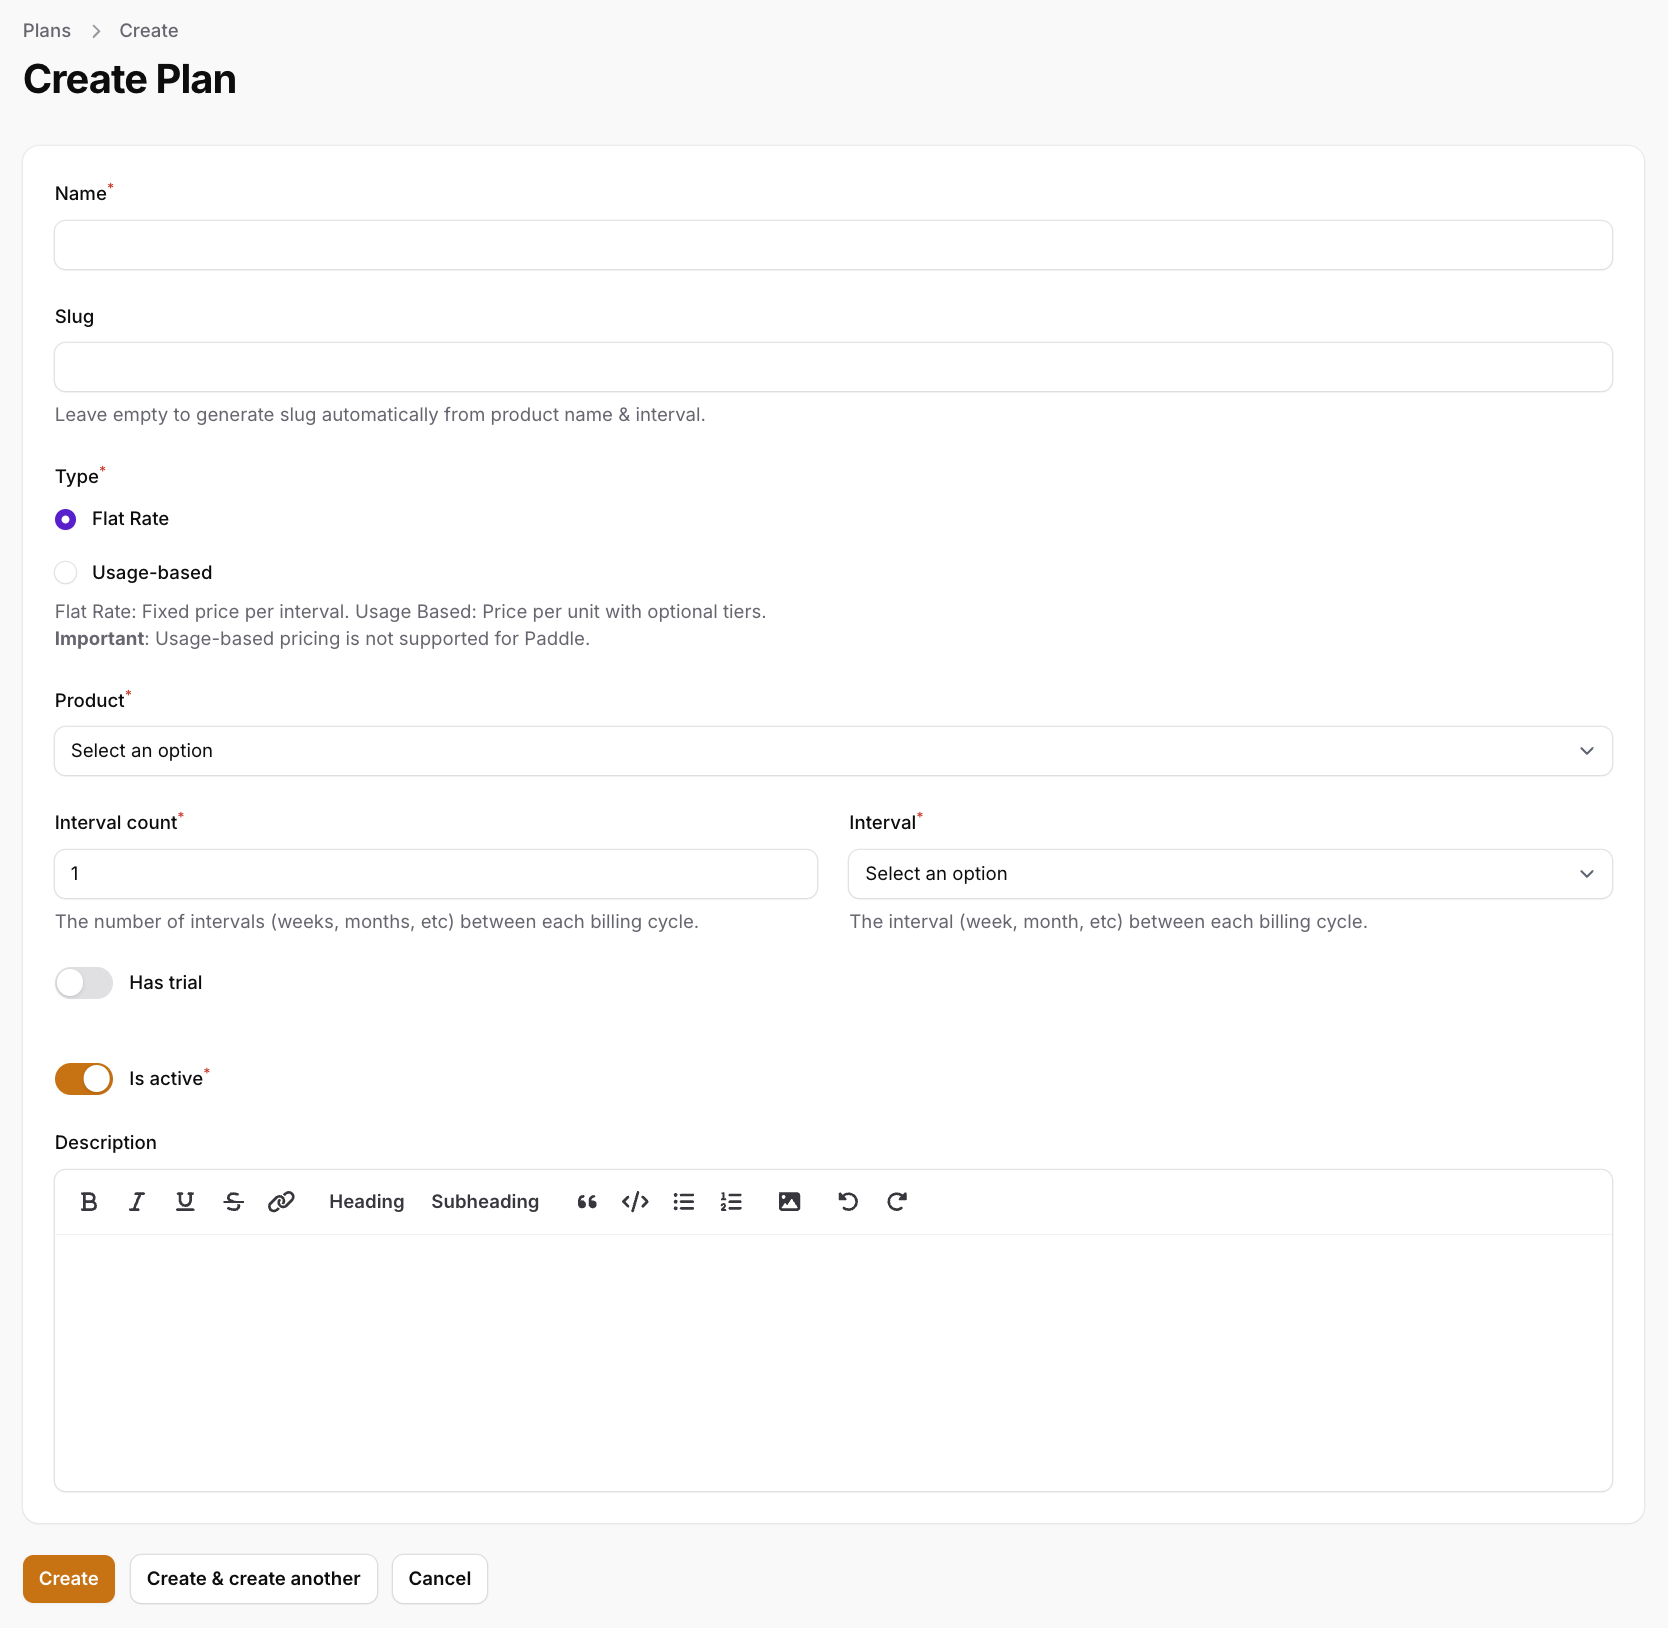
You need to enter the following information about your new plan:
- Name: The name of the plan.
- Slug: The slug of the plan. This will be generated automatically based on the name, but you can change it if you want.
- Type: The type of the plan. You can choose between
Flat Rate,Usage-basedandSeat based(for SaaSykit Tenancy).Flat ratemeans that plan price will be fixed and doesn't change.Usage-basedplans are the plans that are billed based on the usage of the customer.Seat basedplans are the plans that are billed per seat (for SaaSykit Tenancy). - Meter (only used for usage-based plans): The meter of the plan. This is only available for
Usage-basedplans. A "meter" is a unit of usage that you want to charge your customers for. See the usage-based pricing page for more information. - Product: The product that this plan belongs to (select from the dropdown).
- Interval Count: The number of intervals (months, years, etc) that this plan will be billed at. For example, if you want to bill the customer every 3 months, then you need to set this to
3and the interval (see below) tomonth. - Interval: The interval (monthly, yearly, etc) that this plan will be billed at.
- Has trial: Whether this plan has a trial period or not. If this is enabled, then you need to set the trial period for this plan (see below).
- Trial interval count: The number of intervals (months, years, etc) that the trial period will last. For example, if you want to offer a 3 months trial period, then you need to set this to
3and the trial interval (see below) tomonth. - Trial interval: The interval (monthly, yearly, etc) that the trial period will last.
- Is Active: Whether this plan is active or not. If this is disabled, then this plan will not be displayed in the plans component and will not be available for your users to subscribe to.
- Description: The description of the plan.
Flat Rate Plans
Flat rate plans are the plans that have a fixed price that doesn't change. You can create a flat rate plan by choosing the Flat Rate type when creating a new plan.
Usage-based Plans
SaaSykit allows you to define usage-based plans, where you can charge your customers based on their usage. For example, you can define a plan that charges your customers based on the number of API requests they make, or the number of emails they send, or the number of images they generate, etc.
To create a usage-based plan, you need to choose the Usage-based type when creating a new plan. This will allow you to define the usage-based pricing for the plan.
As for prices, you can charge your customer fixed amount per unit of usage, or you can define a tiered pricing model where the price changes based on the usage. See the usage-based pricing page for more information.
Unfortunately, Paddle & Creem do not support usage-based pricing at the moment. SaaSykit will automatically filter out those payment providers on the checkout page if your customer is trying to subscribe to a usage-based plan.
Meter

If you choose the Usage-based type, you'll need to define a "meter" for that usage-based plan. A "meter" is a unit of usage that you want to charge your customers for. For example, if you want to charge your customers based on the number of tokens they generate, then you can define a meter called "Token" and then charge your customers based on the number of tokens they generate.
This meter will be shown to users on the front-end when they are subscribing to the plan and in the plan description.
Reporting User Usage
SaaSykit provides a helper function called SubscriptionUsageService::reportUsage() that you can use to easily report usage for a usage-based plan to the payment provider that the user used to subscribe to the plan.
Seat-based Plans (SaaSykit Tenancy)
If you are using SaaSykit Tenancy, you can create seat-based plans where you can define the number of seats that each plan allows. This allows you to offer a service that is billed per seat. For example, you can offer a service that allows users to use it for $10/month/user, and then if the tenant wants to add more users, they can do that, and they will be billed accordingly.
Seat-based plans sync the billing automatically with payment providers (Stripe, Paddle, Polar, Polar, Creem & Lemon Squeezy). This means that once a user is added or removed to the subscription, the billing will be updated automatically on the payment provider's side behind the scenes for you, and hence it will save you a lot of time and effort.
SaaSykit Tenancy supports two types of seat-based plans:
- Per Seat: Charge your customers a fixed amount per seat. For example, you can charge them $10 per month per user.
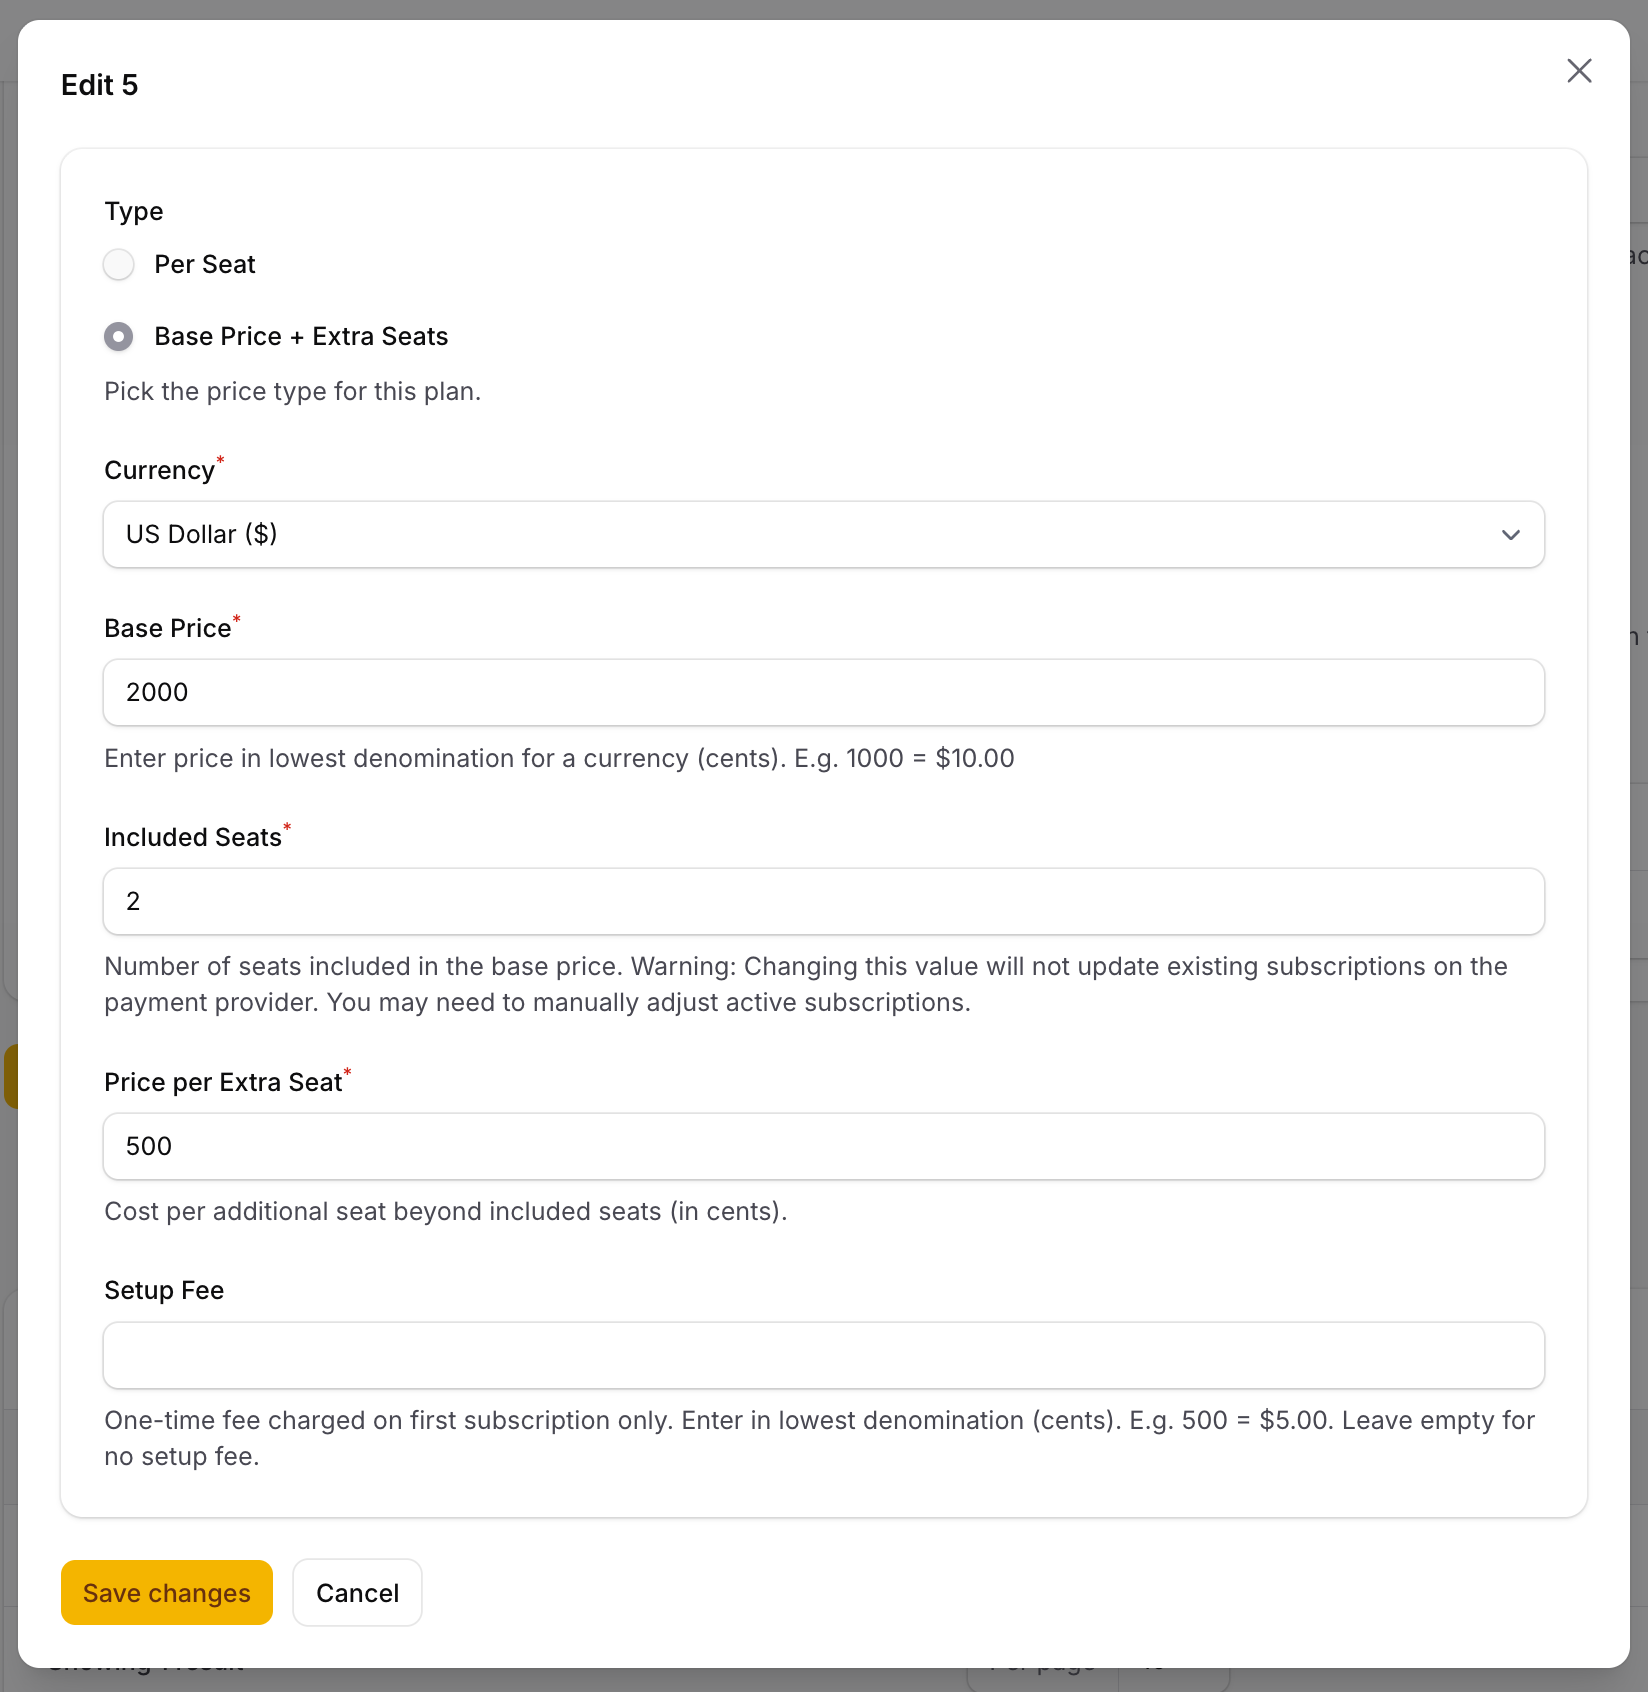
- Seat-based with included seats: A certain number of seats are included in the plan price, and then additional seats are billed per seat. For example, you can charge your customers $100/month for up to 10 users, and then charge them $10/month/user after that.
For more information on how to configure seat-based plan pricing, check the pricing section below.
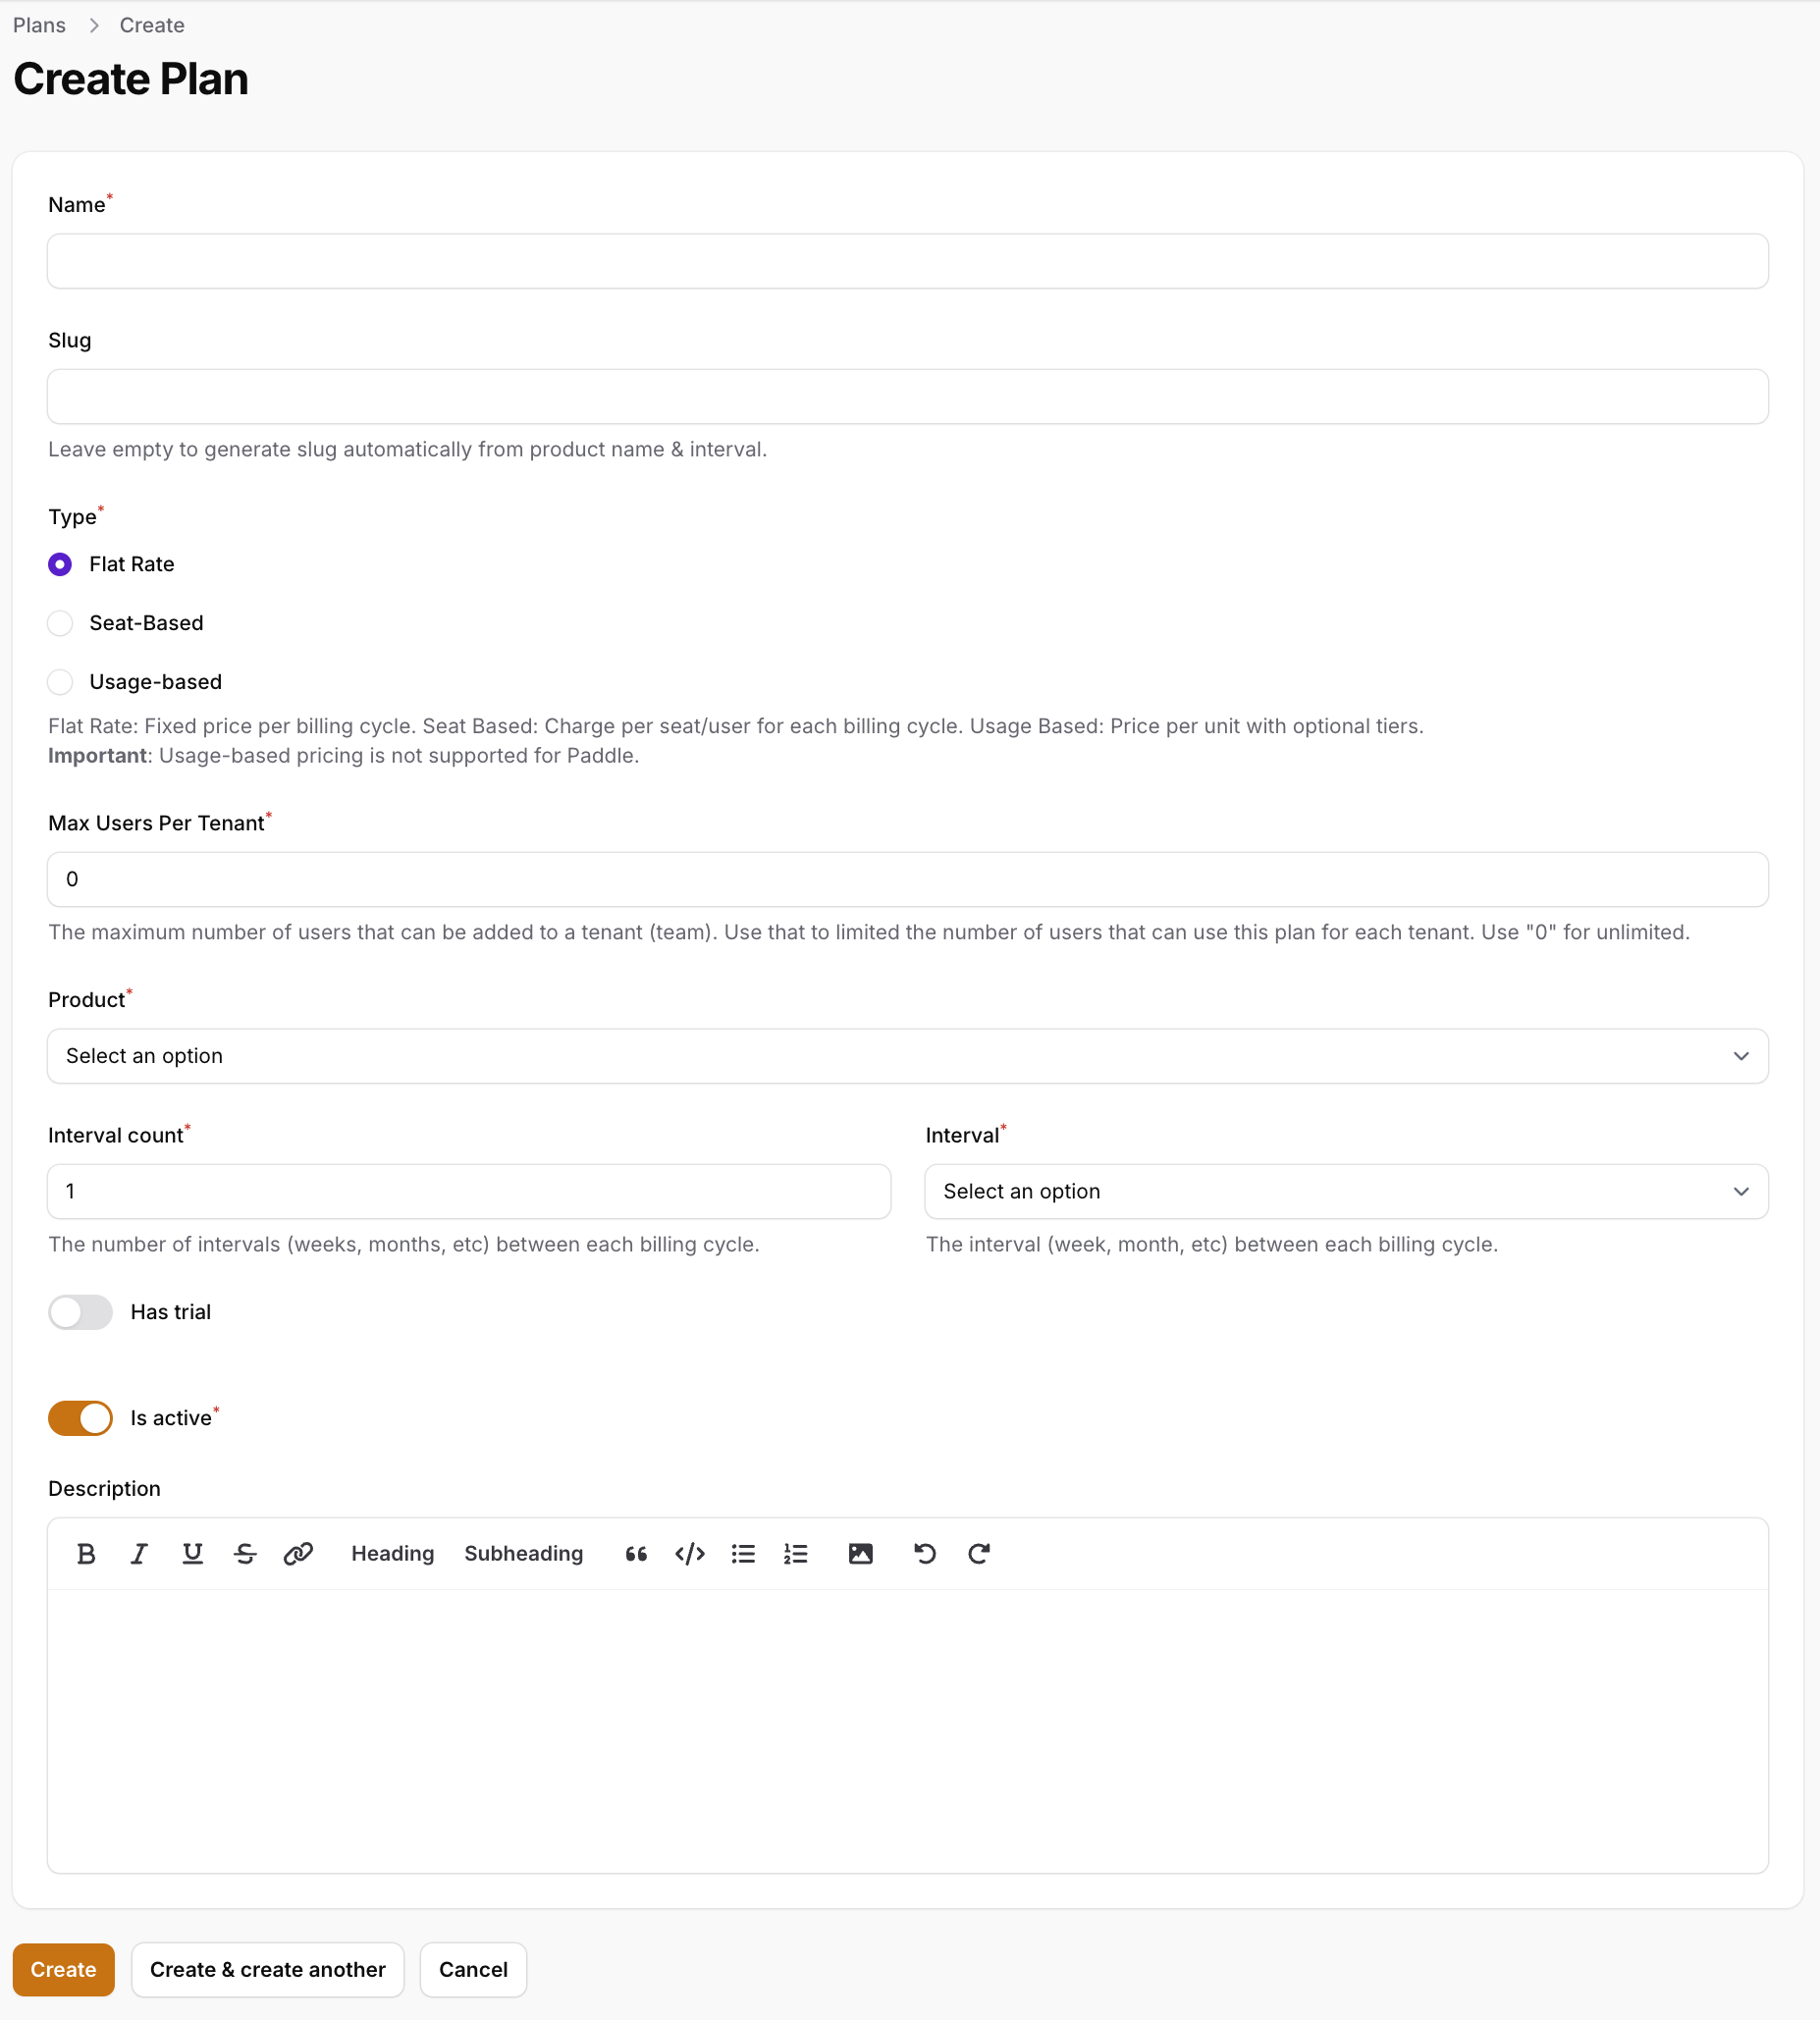
In SaaSykit Tenancy, when creating a plan you will find those new options:
- Type: The type of the plan. You can choose between
Flat RateandSeat based.Flat ratemeans that plan price will be fixed and will not depend on the number of users a tenant has.Seat basedplans are the plans that are billed per seat. - Max users per tenant: The maximum number of users that a tenant can have. This is useful in case you want to limit the maximum number of users that a tenant can have irrespective of the plan type. Setting this to
0means that there is no limit on the number of users that a tenant can have.
Trial Period
As mentioned above, you can define a trial period (interval) for each plan. This allows you to offer a trial period for your customers to try your product before they are billed for it.
This is useful if you want to offer a free trial period for your customers to try your product before they are billed for it.
By default, your users will be required to enter their payment details before they can start their trial, but SaaSykit also supports a "trial without credit card" feature where your users can start a trial without providing any payment details.
Check the subscription trials page for more information.
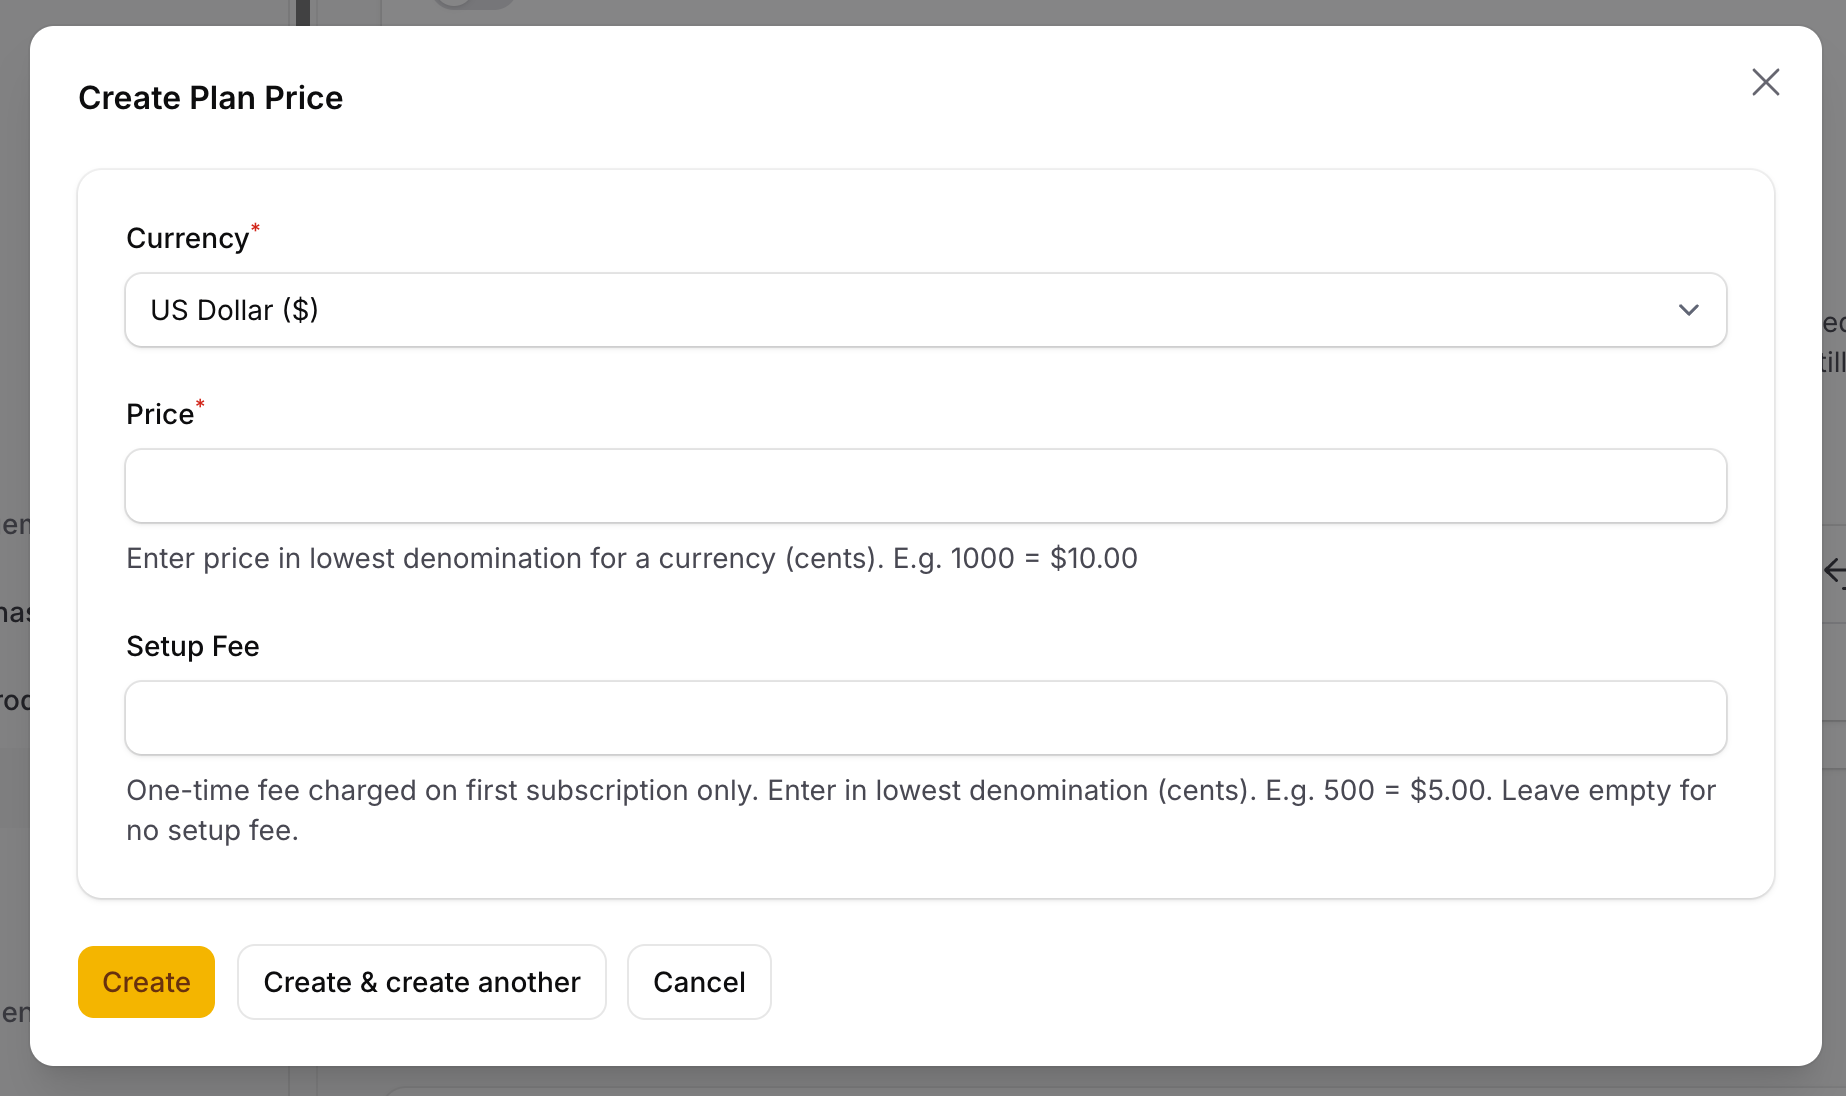
Pricing
Each plan can have multiple prices. You can define pricing for each plan while editing the plan in the Admin Panel.
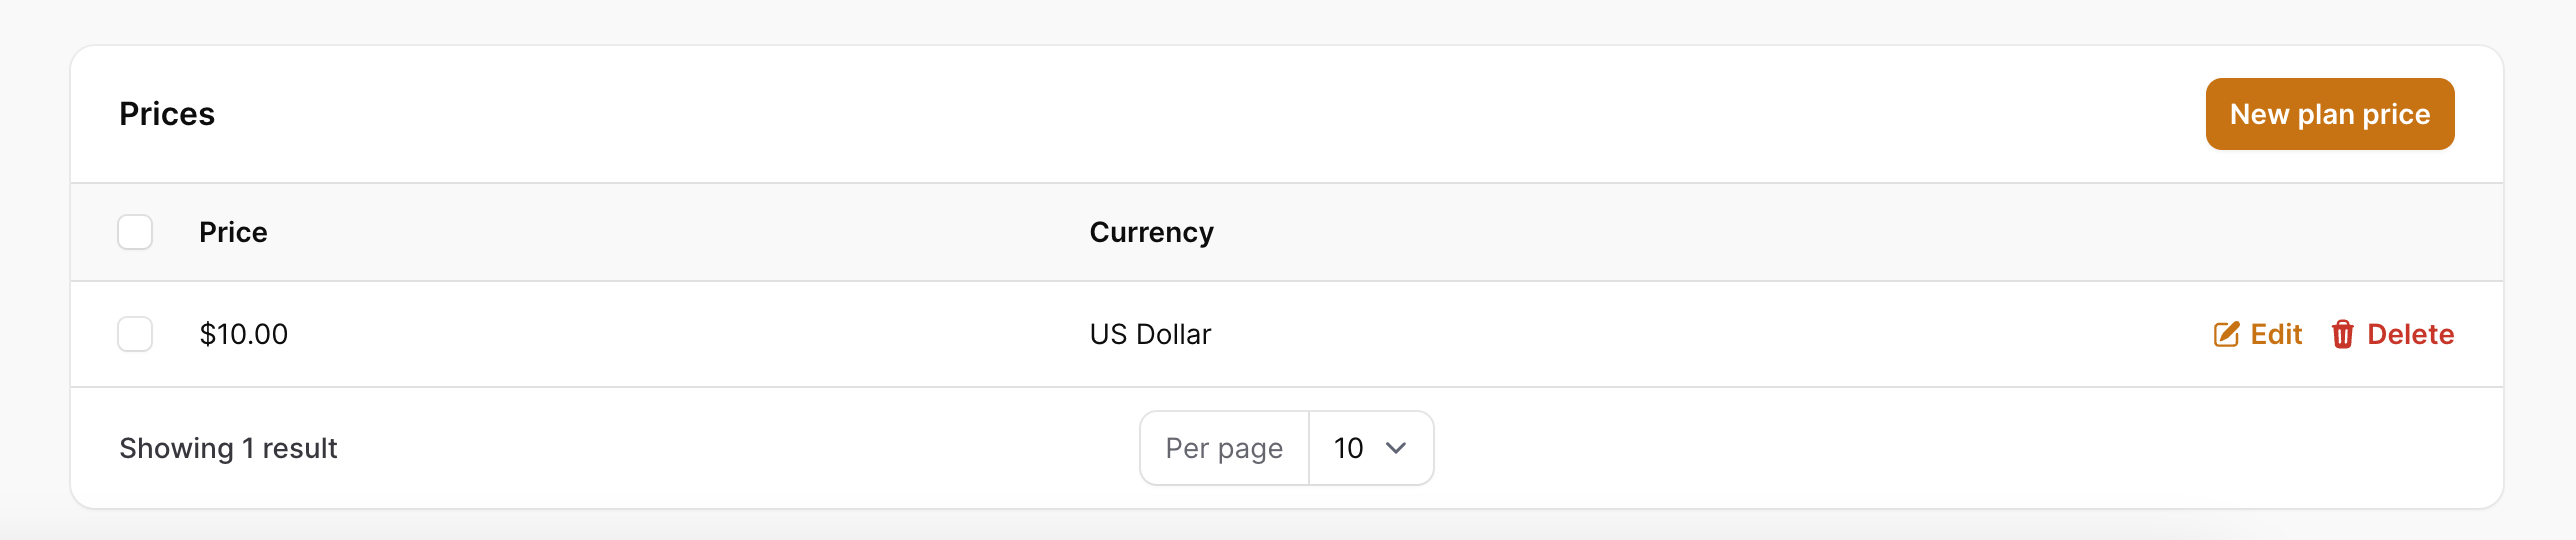
Flat Rate Pricing
For flat rate plans, you can define a fixed price for the plan. This is the price that your customers will be charged at the end of the billing period.
Usage-based Pricing
A usage-based plan can have different pricing models. You can charge your customers a fixed amount per unit of usage, or you can define a tiered pricing model where the price changes based on the usage (e.g. the more they use, the less they pay per unit).
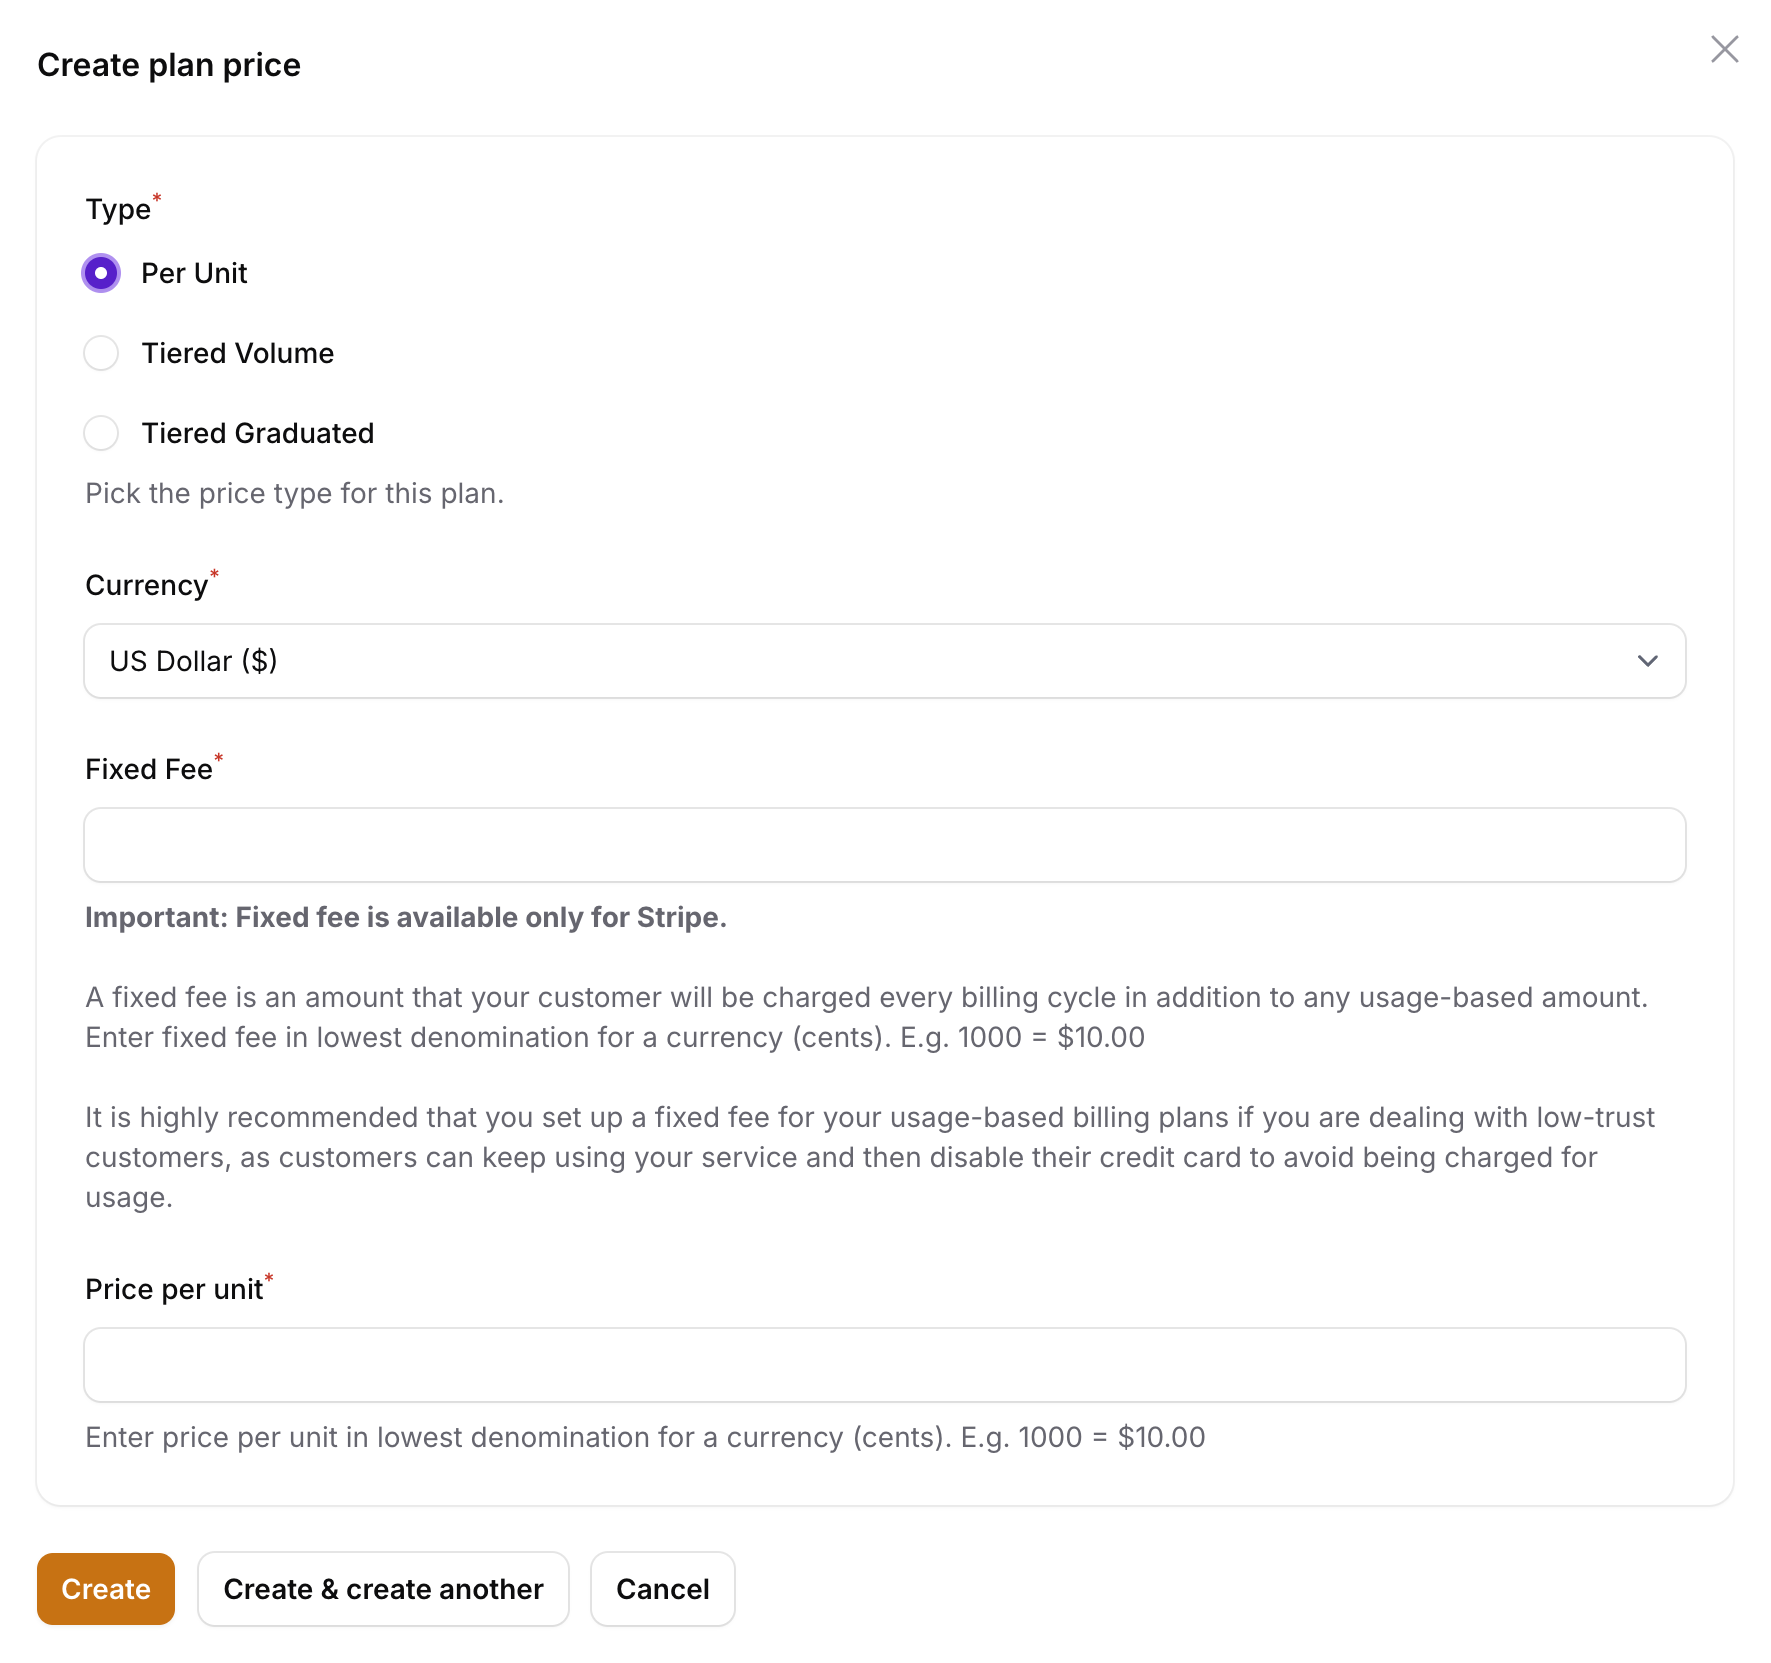
In usage-based pricing, you can define the following pricing models:
- Per Unit: Charge your customers a fixed amount per unit of usage.
- Tiered Volume: Charge your customers based on the volume of usage. For example, you can charge them $1 per unit if they use up to 100 units, and then $0.5 per unit if they use more than 100 units. If a customer uses 200 units, they will be charged $100 since they hit the 2nd tier based on their usage.
- Tiered Graduated: Charge your customers based on the volume of usage, but the price changes based on the usage (e.g. the more they use, the less they pay per unit). For example, you can charge them $1 per unit for the first 100 units, and then $0.5 per unit for the next 100 units, and so on. If a customer uses 200 units, they will be charged $100 for the first 100 units and $50 for the next 50 units (total of $150).
For Tiered pricing models, you can define as many tiers as you want. You can also define a flat fee for each tier. This is a fixed fee that your customer will be charged in addition to the usage-based pricing. For example, you can define a tiered pricing model where you charge your customers $1 per unit for the first 100 units + a flat fee of $10. This means that if a customer uses 50 units, they will be charged $50 + $10 = $60 at the end of the billing period.
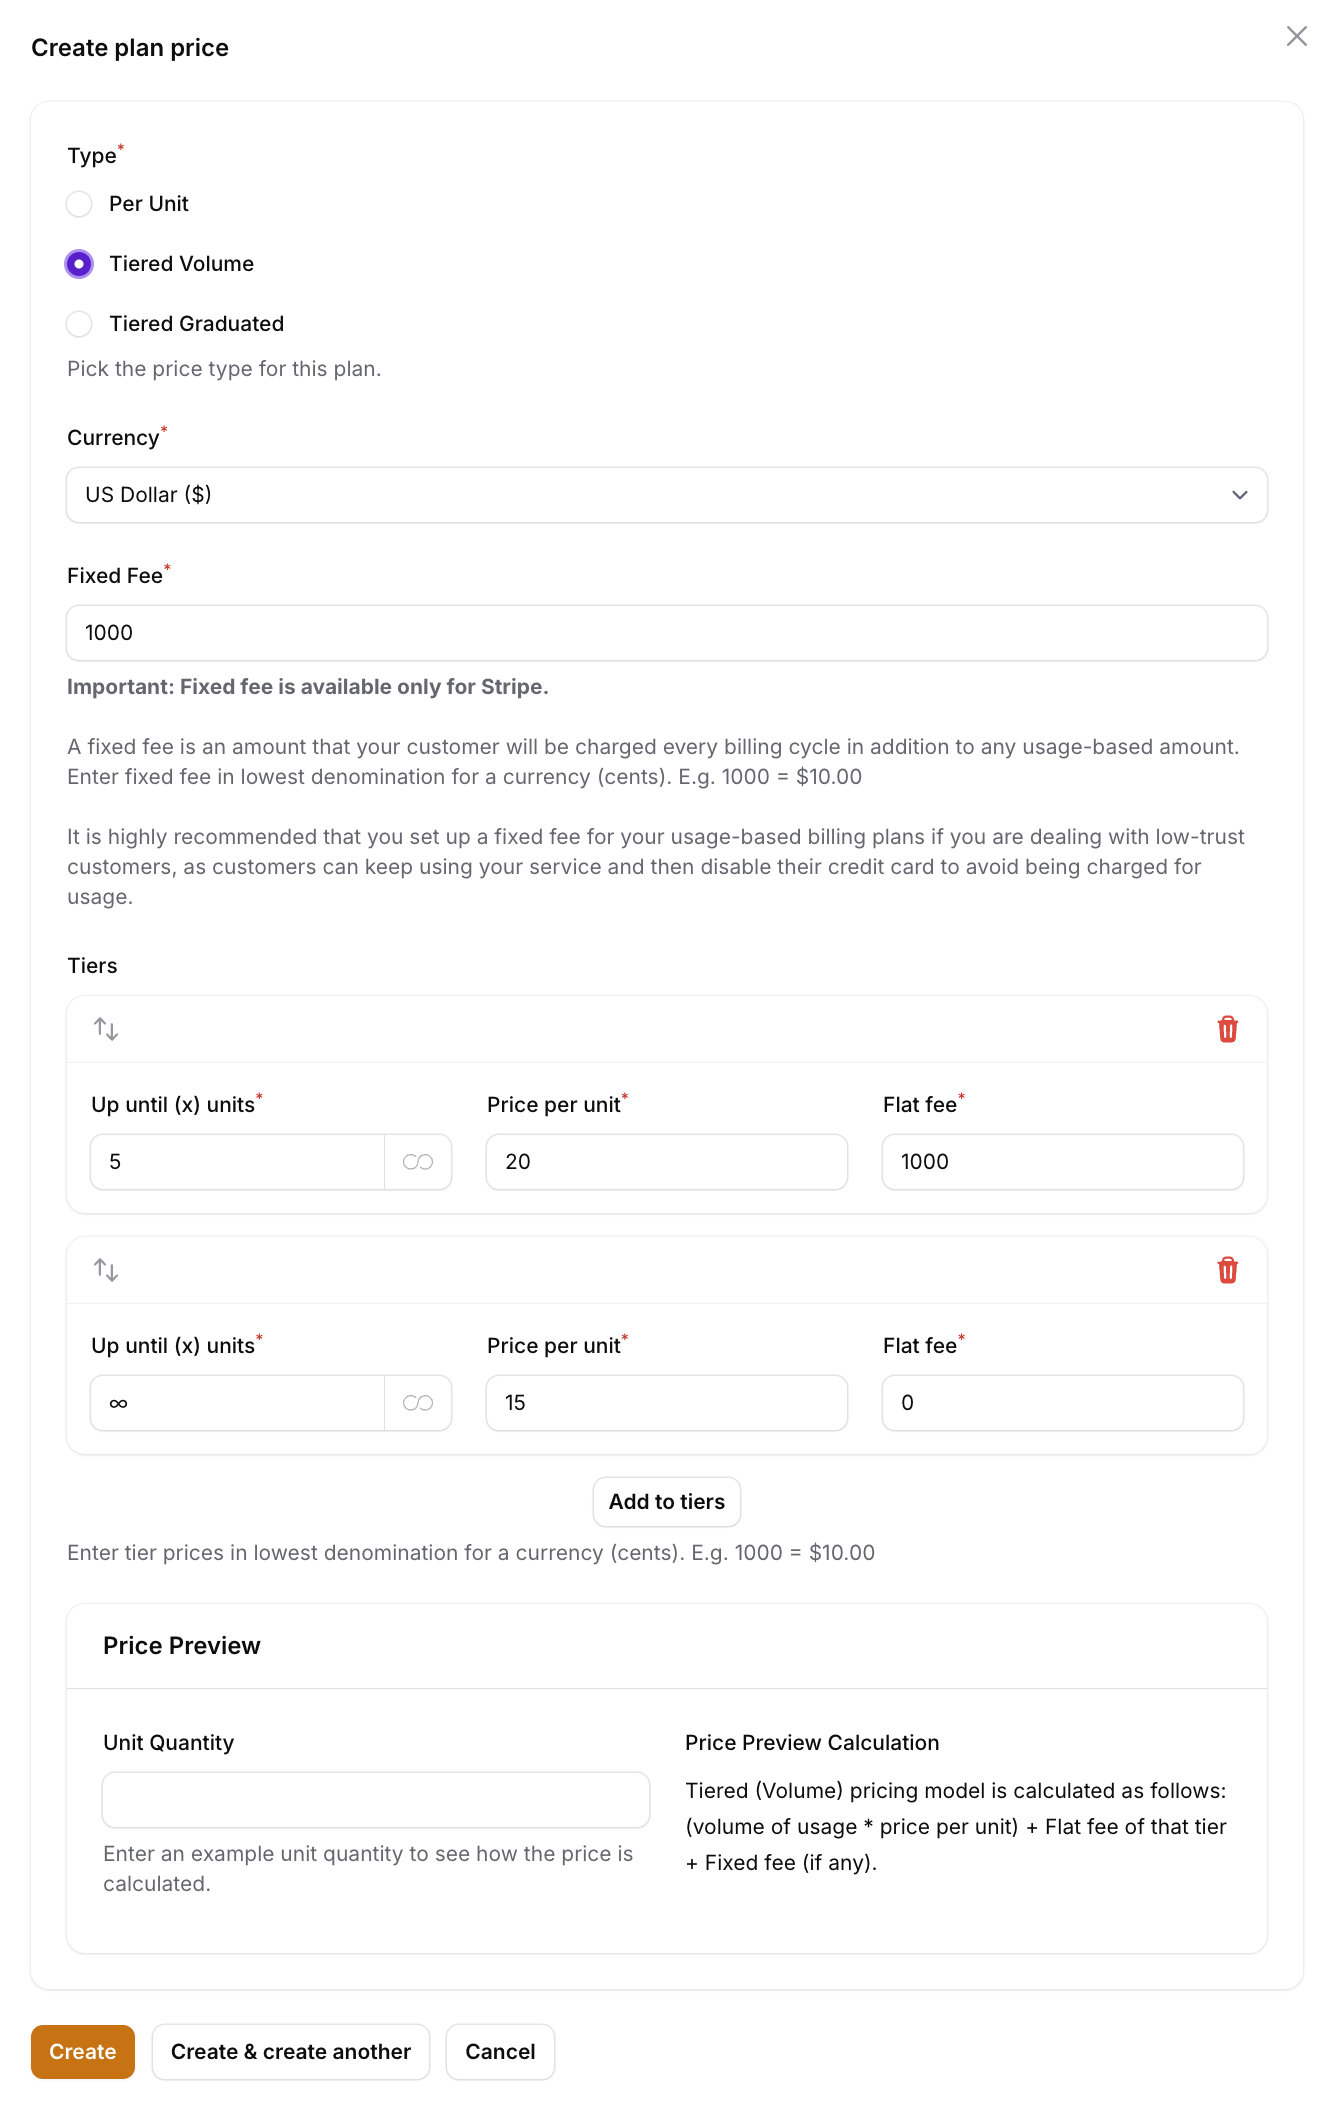
With any of usage-based price types you can define a fixed fee (not to be confused with the flat fee we mentioned above) that your customer will be charged (in advance) in addition to the usage-based pricing. For example, you can charge your customers $10 per month in addition to the usage-based pricing.
It is highly recommended that you set up a fixed fee for your usage-based plans if you are dealing with low-trust customers, as customers can keep using your service and then disable their credit card to avoid being charged for usage. Charging a fee in advance will ensure that you at least filter out those customers who are not willing to pay for your service.
Fixed fees are only supported by Stripe, Lemon Squeezy doesn't support fixed fees.
SaaSykit provides a pricing preview table at the end where you can play around and see how much your customers will be charged based on the usage that you define.

Seat-based Pricing (SaaSykit Tenancy)
SaaSykit supports to two types of seat-based pricing models:
- Per Seat: Charge your customers a fixed amount per seat. For example, you can charge them $10 per month per user.
- Seat-based with included seats: A certain number of seats are included in the plan price, and then additional seats are billed per seat. For example, you can charge them $100 per month for up to 10 users, and then $10 per month per user after that.
1. Seat-based plan pricing
For seat-based plans, you can define a fixed price per seat. This is the price that your customers will be charged per seat at the end of the billing period.
To do that, choose the Per Seat pricing type and then set the price per seat.
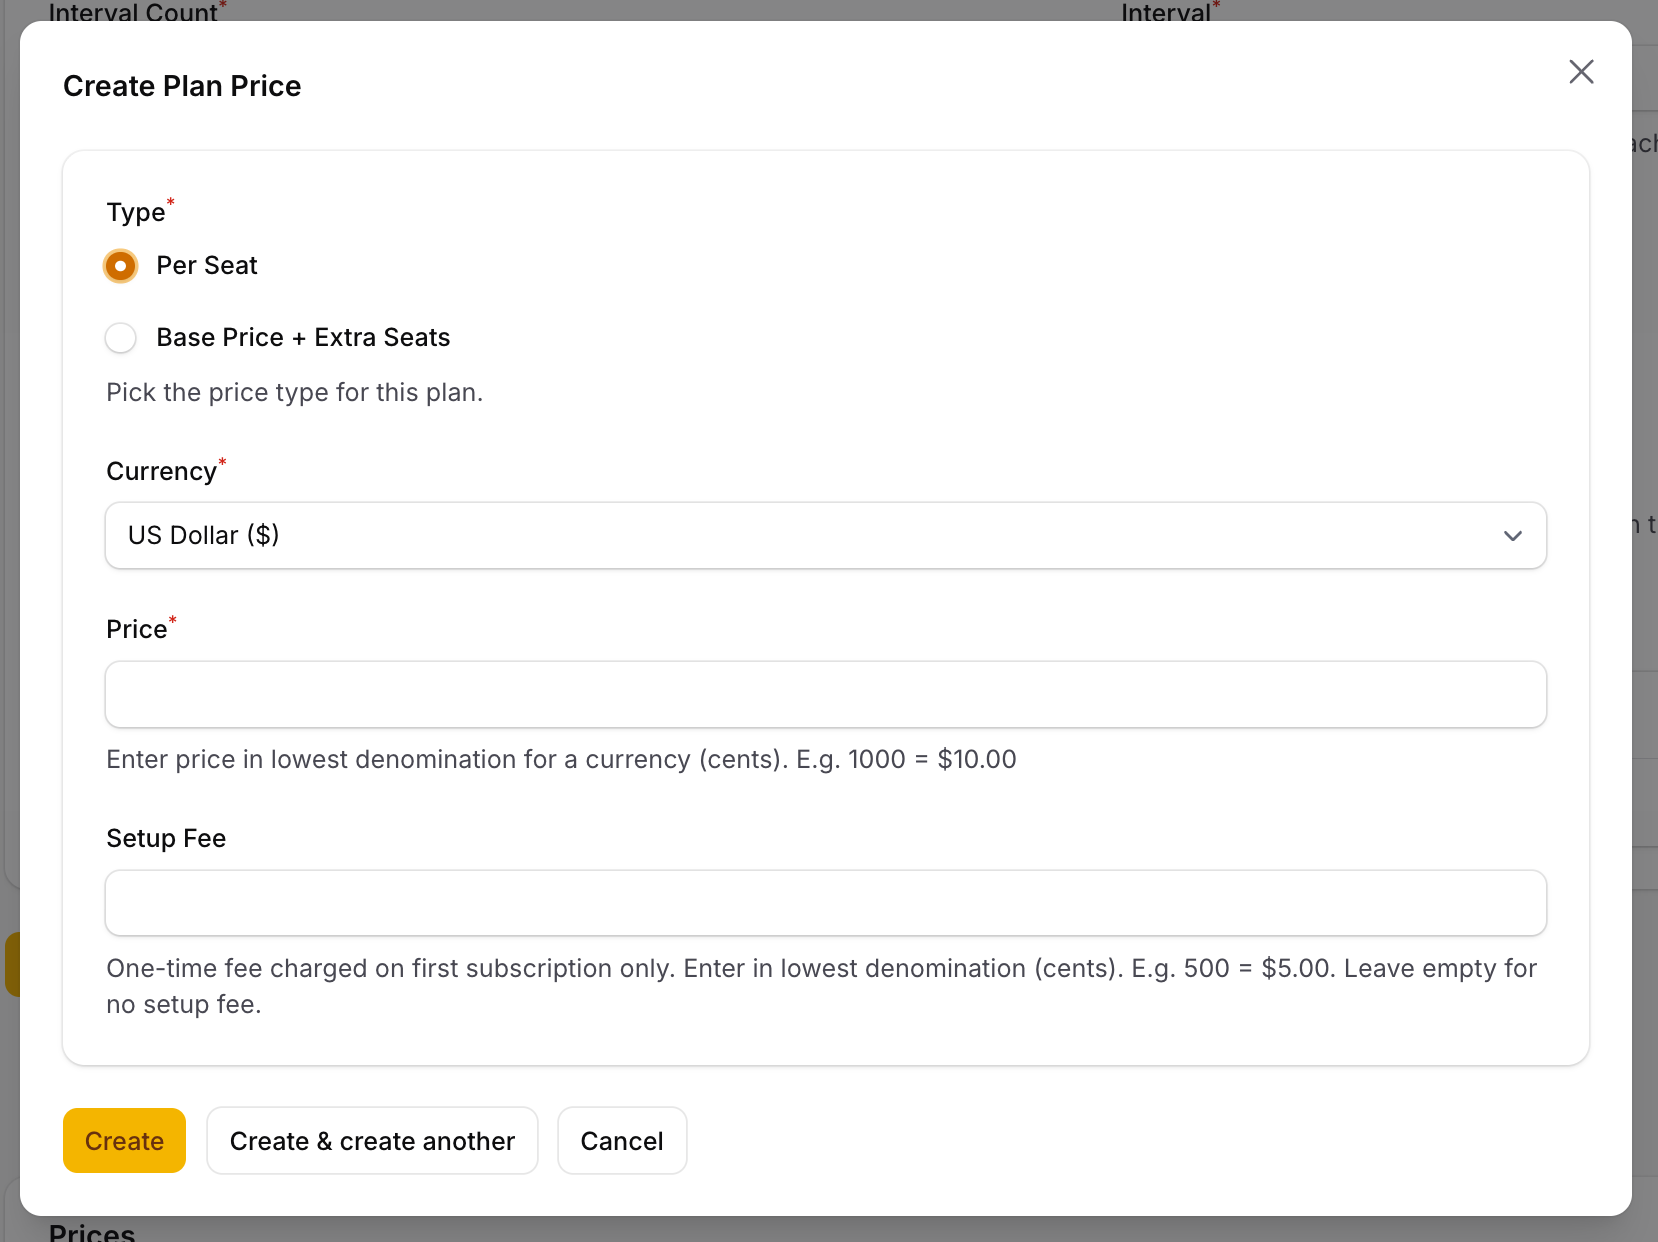
2. Seat-based with included seats pricing
For seat-based plans with included seats, you can define a fixed price for the plan that includes a certain number of seats, and then define a price per extra seat after that.
To do that, choose the Base Price + Extra Seats pricing type and then set the price for the plan that includes the included seats, set the number of included seats, and then set the price per extra seat after that.
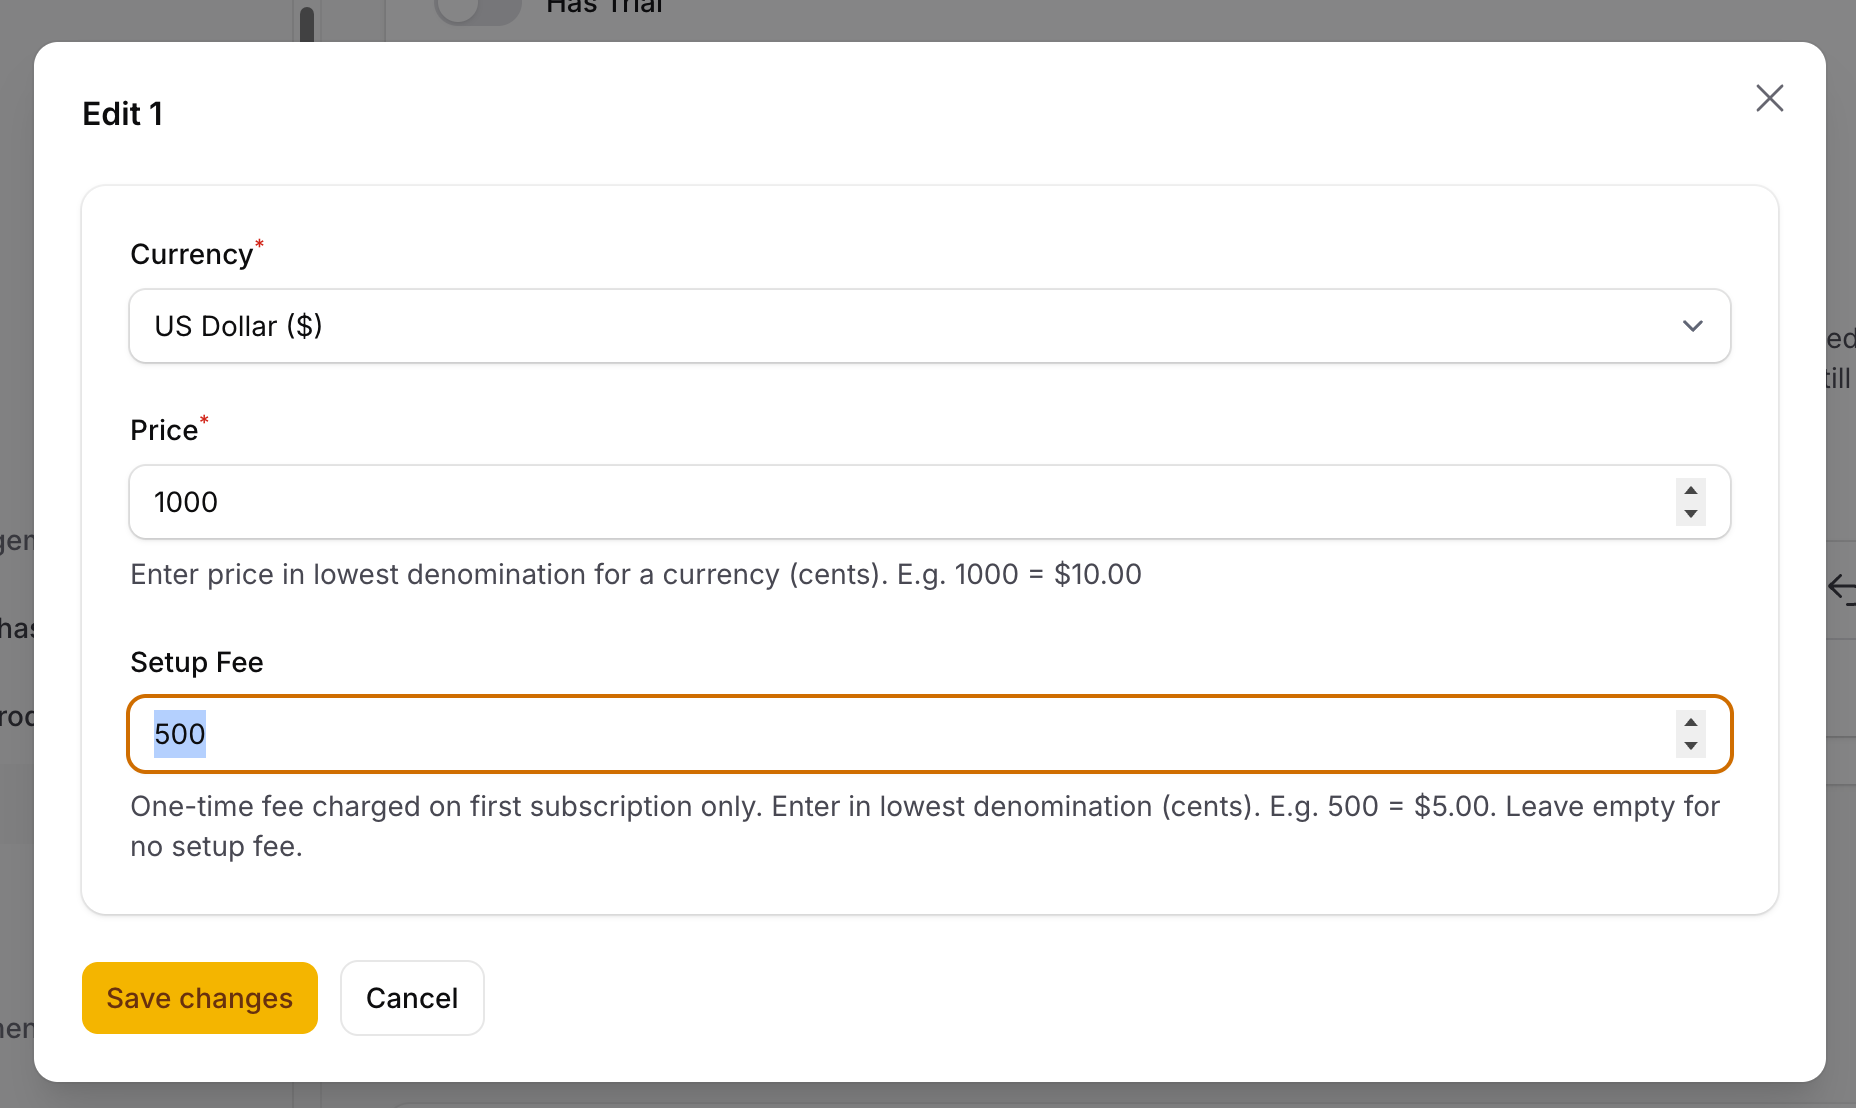
Setup Fees
SaaSykit also allows you to define a setup fee for each plan. A setup fee is a one-time fee that your customers will be charged when they subscribe to the plan for the first time. This is useful if you want to charge your customers a one-time fee for setting up their account or for any other reason.
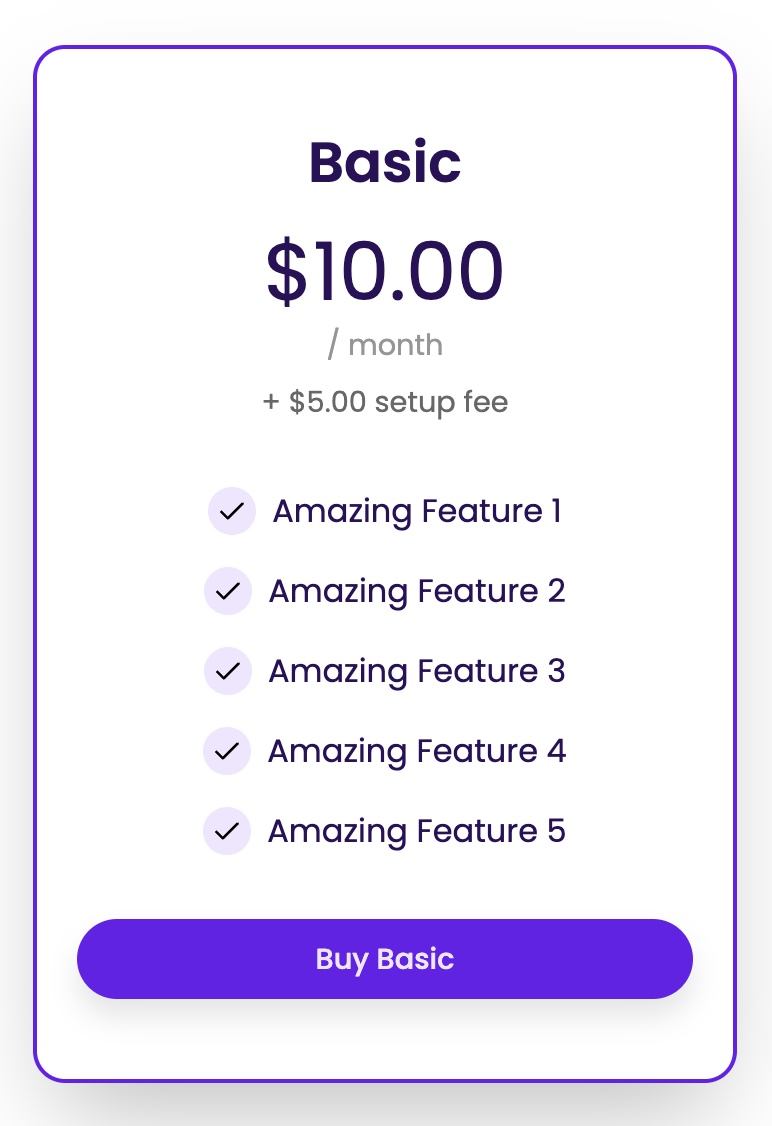
This setup fee can go with any of the pricing models mentioned above (flat rate, usage-based, seat-based) and it will be charged in addition to the regular pricing of the plan.
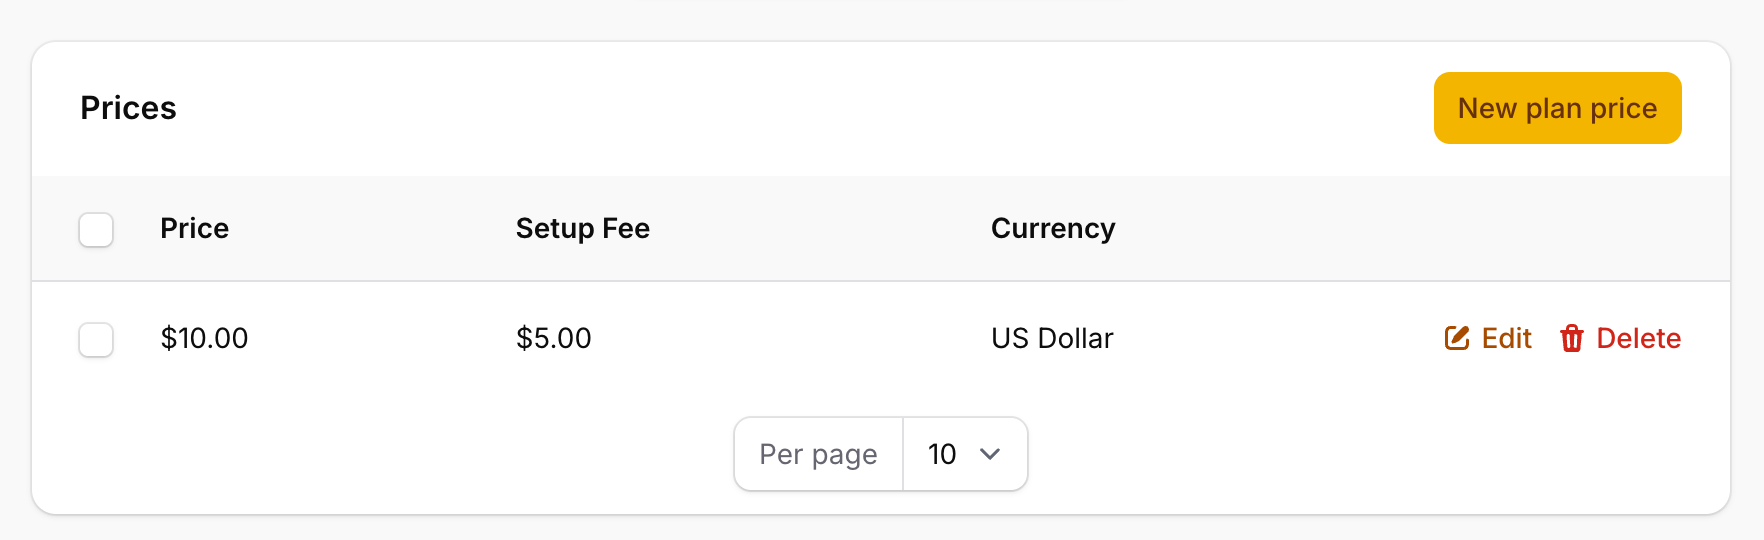
To add a setup fee, just set a "Setup Fee" amount while editing the plan price in the Admin Panel.
For all payment providers except Lemon Squeezy, the setup fee will be automatically created (during product creation), but as Lemon Squeezy doesn't support creating products via API, you will need to create the setup fee manually in your Lemon Squeezy dashboard.
If you decide to have some plans of same type (flat rate, usage-based, or seat-based) with setup fee and some without setup fee, your users might sign up for the plan without setup fee and then switch to the plan with setup fee to avoid paying the setup fee.
To avoid this, it's recommended that you either have setup fees for all plans of the same type, or don't have setup fees for any of the plans of the same type.
Multi-currency Pricing
SaaSykit allows you to define multiple prices for each plan but does not allow for switching prices at checkout page yet. Your users can only pay in the Default Currency that you defined on the settings page.
Supporting multiple prices at checkout will be added in the future.
Common Subscription Product/Plan Setups
"Basic", "Pro" and "Ultimate" Products with Monthly and Yearly Plans�
To achieve this setup:
- Create three subscription products:
Basic,ProandUltimate. - For each subscription product, you need to create two plans: one with a monthly interval (
Basic Monthly) and one with a yearly intervalBasic Yearly. - Add pricing for the plans that you created in the previous step as you see fit.
"Starter" and "Growth" Products with Monthly, Quarterly and Yearly Plans (with trial periods)
To achieve this setup:
- Create two subscription products:
StarterandGrowth. - For each subscription product, you need to create three plans: one with a monthly interval (
Starter Monthly&Growth Monthly), one with a quarterly interval (Starter Quarterly&Growth Quarterly), and one with a yearly interval (Starter Yearly&Growth Yearly).
To create the Quarterly plan, you need to set the Interval Count to 3 and the Interval to month.
Define the trial period for each plan as you see fit.
- Add pricing for the plans that you created in the previous step as you see fit.
"Free" and "Pro" Products with Monthly and Yearly Plans (with trial period)
To achieve this setup:
- Create two subscription products:
FreeandPro. When creating theFreeproduct, make sure to set it as thedefaultproduct. This will make it the default product that is selected when the user is not subscribed to any product/plan. - For the
Proproduct you need to create two plans: one with a monthly interval (Pro Monthly) and one with a yearly interval (Pro Yearly). Define the trial period for theProplan as you see fit.
For the Free product you don't need to create any plans. This will serve as a virtual container to the "metadata" that you want to assign to users who are not subscribed to any product/plan.
- Add pricing for the
Proplans that you created in the previous step as you see fit.
Upgrading/Downgrading Plans
SaaSykit allows your users to upgrade/downgrade their plans at any time through the user dashboard.
This will save your precious time and allow your users to manage their subscriptions without having to contact you.
You can adjust how pro-rations are handled (how your customer should be billed when they upgrade/downgrade) in the settings page.
Usage-based plans cannot be upgraded/downgraded. This is because there is no way to calculate the pro-rations for usage-based plans, and also these plans could be using different meters, so it's not possible to upgrade/downgrade them. If a user is subscribed to a usage-based plan, and they want to upgrade/downgrade, they will have to cancel their current subscription and then subscribe to the new plan.
Displaying plans on your site
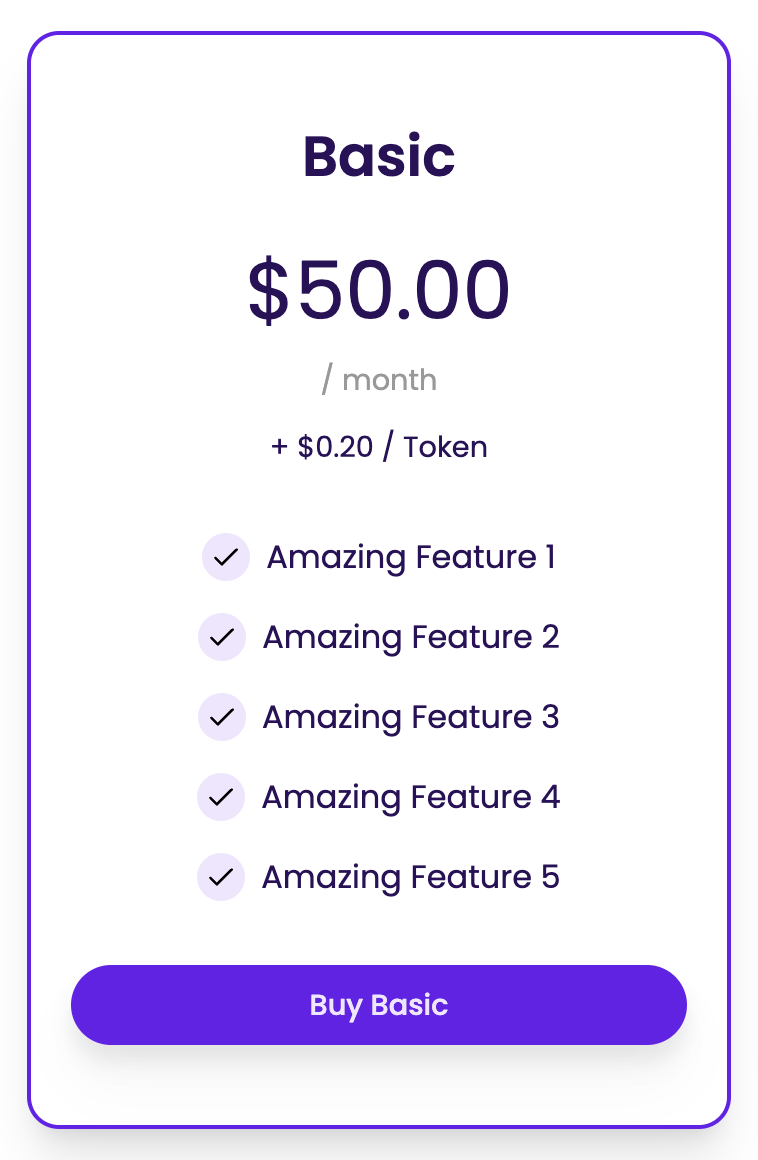
SaaSykit comes handy with the magical ✨plans component that you can use to display the plans that you offer on your site in 1 line of code.
Depending on the price type of the plan, the component will display the price (along with per unit/seat amounts) with the currency and the interval that the plan will be billed at. It will also display the features of the plan that you defined in the Admin Panel.
Multiple Active Subscriptions per User
By default, SaaSykit allows your users to subscribe to only one product at a time. This means that if a user is subscribed to a product, they cannot subscribe to another product until they cancel their current subscription.
However, you can enable "Multiple Subscription Products" in the settings page to allow your users to subscribe to multiple products at the same time if you want to offer multiple products to your users.